Barry's Reprap Build

This blog follows my attempts to build a reprap system.

Monday, January 26, 2009

Got a diode backwards and another board finished

So Wade was having a look over the two boards I finished last night and spotted that one was backwards. He showed me how to desolder with solder wick and sorted it out for me. This is the third time he's spotted me doing something wrong and steered me clear before I blew anything up.

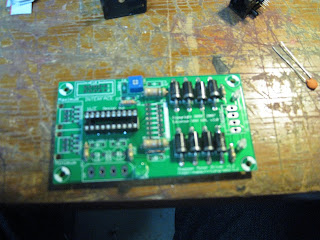
In other related reprapping new I got the DC motor board finished. This was a much denser board but didn't have any of those bloody diodes. Wade's reprap seems to be doing well at the moment, there's some clutching issues with the extruder motor but he's tweaking the config to play around with it.

Here's a few photos of what I've done:

The bottom right diode is the offending member post repair.

One DC motor kit pre soldering.

One DC motor kit post soldering. I've yet to stick in the chips and solder on the interface wires, called it a night a bit early.

Sunday, January 25, 2009

Two more stepper motors

Got the two Stepper Motor Control Boards completed last night. Soldering is starting to speed up a small bit so hopefully I can blast through the remaining boards. I didn't actually plug in and test the two boards yet as I don't have my own PSU and I didn't want to fiddle with Wade's while a good build was in progress.


In other good news Wade seems to have his new extruder going well and sorted out the skips on the x-axis. So he's currently printing out a set of extruder parts for me. Oh I also set up the shuttle in the workshop. Man the shuttle is light. I wish I'd bought a shuttle years ago when I used to go to lan parties. Would have saved so much lugging.

As usual some photos of the current work.

Last set of Diodes to do.


Making some progress.

All done!


Here's the shuttle in its new home. Neo looks impressed.

Tuesday, January 20, 2009

My shuttle has arrived!

I'd decided last year to invest in a zareason shuttle. Quick intro to what zareason is. They started out as a non-profit making linux boxes at a computer hardware recycling centre for low-income applicants. Basically spreading the good word of Linus. Before long they realised they were very good at this and started to offer the service online.

I'd say I've emailed these guys ten times with dumb hardware questions and they've always given me time and good answers. I made the mistake last year to buy a dell server that was going off lease from my company. With two months its power supply went the way of the Dell plant in Limerick. Last time I ever purchase a piece of dell hardware.

Anyway I saved up for this little beautie. And considering I'm building a reprap, I thought this might be the perfect excuse to purchase it. Origionally I'd planned on using it as a media server but I'll just have to save up for one of these.

So the box arrived yesterday, only a few days after I ordered it. Thankfully they support USPS for us Canadians (well I'm Irish but have to suffer the customs and UPS tax like the rest of them). It took me around 15 mins to yank it out of the box, plug in all the pluggy bits and boot up Ubuntu. So installing, no hoping you can find drivers for your hardware, no pain basically. The wifi card I got installed registered immediately and picked up my network. I took a few shots, plugged in my Canon and it registered it and popped up F-Spot to pull them off.

I'd say I've set up maybe 10 linux boxes in my time. And I can't say its always been a horrible experience installing linux (RHEL excepted) but getting drivers to work and picking the right mix of software can take a lot of reading and trial/error. Well Zareason completely remove any need for that. I really think if you're considering getting a new machine, unless its a laptop (than get a mac) I'd say go for one of these guys.

Anyway enough waffling, I haven't done any more soldering since the weekend. I'd planned on going up and doing some more tonight but I'm knackered after my first Krav Maga course. Esp since I thought it was on at 6:15 am rather than pm so arrived at the gym 12 hours early. Here are a few photos of the unboxing I took. Enjoy :).

Comes well wrapped with a nondescript outer box that has the shuttle box inside.

Like Russian dolls here's the shuttle box.

They give you this zareason pen screw and a shot of they're sticker. I wish they'd put in a few of those stickers in would have like to stick one on the box.

The shuttle pc, cool looking piece of kit.

And 15 minutes after breaking the seal on the box I have ubuntu installed and ready to go. The machine is quiet, picked up a wifi connection right away, picked up my camera, had gimp installed so I could rotate the above picture. Proud as punch with my latest purchase.

Sunday, January 18, 2009

Halfway through two more stepper motors control boards

Got a chance to do some work on the reprap yesterday. With Wade's advice on began soldering the remaining two stepper motors at the same time to speed things up. This was really good at speeding things up except for when I tried do all the diodes at once. The unsoldered diodes with their wires still attached acted as heat sinks so it was almost impossible to melt the solder. It took around 3 diodes of battling for me to figure out what was going on.

I'd hope to get a bit more done this weekend but I ended up getting food poisoning which layed me low.

Anyway here's a few photos:

Laying everything out before I get started, hey I knew all those hours of technic lego/meccano would serve me well.

Turns out a Sharpie pen is perfect height for balancing the board on while soldering the chip socket.

Putting in all the diodes at once, this was a stupid idea as they just acted as heat sinks

This is me trying to be arty.

Got the diodes completed on one board before the squirts forced me into full retreat.

Thursday, January 15, 2009

Finished first stepper motor

Got a chance last night to have a go at some more soldering for the reprap. With Wade's help, overlooking my dodgy soldering I managed to get my first Stepper Motor control board completed. I was able to speed up the soldering a bit my making sure to keep the solder tip well tinned. Still I'm fairly crap at it and surprised I didn't melt anything. Its pretty cool to be able to plug my first reprap board into the power supply of a fully functioning reprap that's alive and kicking, printing out an extruder head.

Wade's also going to put me in contact with the two other guys he traded a set of parts for beer. Hopefully we can get collaborate on our builds. If there's any other Toronto based reprappers might be worth setting up a user group.

Anyway here are a few more photos:


This is my workspace, ah doesn't the mac book just look cosy nestled in there.


Stepper Motor Control Board v1.2 number 1 where I left off.


Power supply and voltage controller added.


All finished, heat sink, ethernet jacks, and more.


Plugged into the psu on Wade's reprap its comes alive. Thunderbirds are GO!


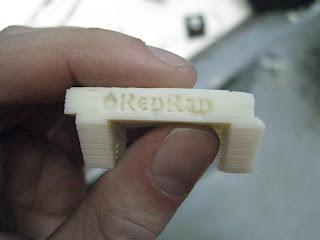
Just wanted to post this up, this is a part off Wade's machine. Its a little messed up as the y-axis appears to have slipped a tooth but the reprap lettering and symbol came out really well.

Monday, January 12, 2009

My Precious

Thought I'd post up a picture of the ring that Wade printed out for me the first night he was showing me around his reprap.


The next night he printed off one 10% smaller to fit my girlfriend's hand. It was an uncanny fit. She's worn it out in public since, I'm a lucky man.

Sunday, January 11, 2009

My Brother's Augmented Reality Painting Project

Take a gander at Filippo. This is my brother's latest project. Its a drawing aid which uses Augmented Reality to project an image onto a piece of paper on your computer so that you can trace the drawing. He has a video posted up which demonstrates the concept well.